
TechTip Topics:
1. Demo Instructions (SPC Express for Windows)
2. ASCII Transfer Option (depricated)
3. Converting Subgroup Data (depricated)
4. Adding (or renaming) a Traceability Field (SPC Express for Windows)
5. DDE - Dynamic Data Exchange (SPC Express for Windows)
6. Data Access Object (DAO) Library Installation (SPC Express for Windows)
7a. Copying Subgroup Data from Excel to Access (SPC Express for Windows)
7b. Importing Excel data into SPC Express from a spreadsheet (xls) file
7c. Importing Excel data into SPC Express using a CSV file
7d. Exporting SPC Express data into an Excel or CSV file
8. Interfacing a LaserMike with AutoTrans
9. Interfacing a LaserMike with SPC Express for Windows
11. Creating Windows Short-cuts for Windows
12. Using an Electronic Gage (or Text File) with SPC Express for Windows
13. Database Connection Error when Starting Release 5
14. How to REPAIR a Damaged Part File (.mdb file)
15a. What does a typical SPC Express Data File (.MDB) look like?
15b. Making a traceability field larger
16. Network Installation Instructions
17. Using SPC Express without a Mouse
18. Error: Can’t create the field [SystemOptions] upon startup
19. Email a Report How can I do it?
20. Printer Error #10H What's wrong?
21. Can't read ScopeLog.txt or ScopeTab.txt file Error in AutoScope
22. Various Alerts How to Set-up various Alarms & Emails for OOC and OOS conditions
23. Passwords Using Passwords with SPC Express
24. Running SPC Express on Windows 7,8,10 (and HELP problems)
25. Turning On/Off Various Spoken Messages
26. MSCOMM32.OCX has not been registered properly
Please let us know if you have any requests for additional TechTips ...
|
1.
|
SPC Express for Windows - Demo Instructions
|
Thank you for requesting a demo copy of SPC Express for Windows. Hopefully, it will help you
decide that this is the SPC software package for you and your company.
This demo disk is a "working demo." In other words, you can actually use this demo to
enter your own data and print your own reports. You will be limited to a small number of
files and a small number of subgroups. You also will not have the benefit of the User
Manual. However, we believe that SPC Express is so easy to use, you'll hardly miss having
the manual.
After installing and starting SPC Express for Windows, click on Help (*), Topics, and go to
the Tutorial for a step-by-step lesson on using SPC Express. If you wish, you may even click
on Print to obtain a printed copy of the Tutorial instructions.
(*) If you are having trouble getting Help to work properly on your Windows 7, 8, or 10 system,
please see Tech Tip #24.
Installation and Start-Up:
To use the demo, you'll first need to install the software onto your computer. (Windows
98/NT4 or Windows 2000/XP is required.)
To install SPC Express for Windows, insert Disk 1 of 3 into
drive A and Run A:SETUP from the Windows Start Menu (or D:Setup if you have a Demo CD).
You will be asked to specify a directory (or folder) where you
want SPC Express to be installed.
Enter whatever you want, although we recommend the default of C:\SPCXW.
The installation procedure should create an icon or shortcut on your Windows desktop.
To start SPC Express for Windows, simply double click on that icon.
If, for some reason, you did not get a short-cut, you can create your own or start SPC Express
from the Start/Programs menu.
Creating a Part File:
From the Main Screen, choose File, Create a New Part File (or click on the toolbar button
labeled PT). Choose a directory (or folder) for this new part file. Enter the file name,
such as DEMO-001 and click the [Create] button. When asked, enter a Part Number and
Description and any other information that you want. Choose a few traceability fields, such
as Operator and Lot Control Number. Choose them by highlighting them on the left side, then
click the [Add->] button to copy them to the right side. Finally click [OK] to save this
Part File definition. You will then be asked to define a Characteristic for this Part File.
It may be for either variable or attribute data. You must fill out both the Characteristic
and Dept/Process fields. Fill out the subgroup size (typically 5) and the spec limits.
Finally click on the button labeled [ All Done (save) ]. Note that there are three optional
tab sheets called Optional Info, Input Options, and Formats. You do not need to fill out any
of these tab sheets unless you need the advanced functions that they provide. Feel free to
take a look at them before clicking on the [ All Done (save) ] button.
Entering Subgroups:
To enter subgroups, first open that Part File/Characteristic that you just created. We
suggest that you open both a subgroup view and an X-Bar R chart view. That way, you will see
your subgroup points plotted immediately as you enter them! If your file opened up initially
as an X-Bar R Chart, click on the blue Subgroup toolbar button to add a subgroup entry view.
(Note: the yellow toolbar buttons change the type of view, the blue buttons add a new type
of view.)
Chart/Screen Customization:
When viewing a chart, choose menu option: View, then Chart Options. From here you may
select any Month, Quarter, Year, chart width, etc. Also, you may choose File, Global
Preferences to define your company name, font choices, etc. You may also want to change the
setting of: Window, AutoTile. Hints: right click on a subgroup entry window to auto-size it,
click on any subgroup point on an Xbar R Chart to see more info.
If you have any difficulties or have any questions, please give us a call. We look
forward to helping you! Thanks again for reviewing SPC Express for Windows.
|
4.
|
How to Add/Delete/Rename a Traceability Field
in Part Files for SPC Express for Windows
|
At the present time, SPC Express for Windows Release 5, does not allow you to add or delete
Traceability Fields once a new Part File has been created. However, if you have a copy of
Microsoft Access, you may add, delete, or rename these fields. Before attempting to do this, please
make a back-up copy of your Part File.
Your Part File ends with an .MDB file extension such as
PN1001.MDB. We suggest you name the back-up copy filename.MBU.
Click Here for Detailed Instructions (PDF)
The instructions below are based on Access 2003. Your version of Access might be slightly different.
A. Getting started:
- Open Microsoft Access.
- Open the SPC Express Part file that you wish to change.
If you see a warning message:
You can’t make changes to database objects in the database ...
This database was created in an earlier version of Microsoft Office Access.
|
To correct this situation, click on: Tools, Database Utilities, Convert.
Choose your Part File. You will be asked to enter a new name for the converted file. You
must enter a new name. Access will not allow you to enter the same name as the original
file. So make up a new name. If you want the new file to have the same name as the original
file, you’ll have to rename it later.
|
- You are now ready to add, delete, or rename a Traceability Field.
- From the "Tables" Tab, highlight the Table called:
"_MMS3_Variable Field Descriptions" and click "Open".
If all you want to do is RENAME a traceability field, you need to make this change in 2 places.
- First, edit the field name in the 'Name' field of the '_MMS3...' table.
- Second, change the field (column) name in each of the characteristic tables where the subgroups are stored.
These are the Table(s) that follow the table named '_MMS4...'
-
You may also INSERT a traceability field into the list.
Click Here for Detailed Instructions (PDF)
Click Here for sample screens.
To check your work, close the Part File in Access and then try to open it in SPC Express. You
should see your new field appear on the subgroup entry form. You should also try to enter a
new subgroup. If it saves the new subgroup without an error occurring, you probably did
everything right!
If you get an error in SPC Express that says "Last entry not called 'Invalidated'", you
must "compact" the database. Go back into Access, open the mdb file, click on Tools /
Database Utilities / Compact Database.
If you get an error in SPC Express that prevents you from entering subgroups with blank
traceability entries, you may need to get the latest version of SPC Express.
|
5.
|
DDE - Dynamic Data Exchange for
SPC Express for Windows
|
DDE information:
AppName = "ExpWin"
Topic = "Send_Sample"
Data = "1.2345" (for example)
|
6.
|
Data Access Objects (DAO) Library Installation
for SPC Express for Windowss
|
Earlier versions of SPC Express for Windows (before August 26, 1998) were shipped with an
installation program which did not always detect the existence of newer versions of a Data
Access Objects (DAO) library that might have already been installed on your system. If you get
an error message when starting SPC Express indicating that the DAO libraries could not be
located, you will need to install the correct DAO library (version DAO3032.dll).
This procedure is very easy to do and takes less than a minute. You will need to download
the FixDAO installation routine and then run it. If you think you need this, please contact MMS.
Also see Tech Tip #13 .
|
7.
|
Copying Subgroup Data from Excel to Access
for SPC Express for Windows
|
-
Be sure to name your Sheet (if you choose to rename it) so it does NOT have any SPACES
or PERIODS in it. That seems to confuse Access. Or just leave it as
"Sheet1".
-
Also define a print range which covers your data area.
-
Then, in Access, click on File/GetExternalData/Import, then click on "show named
ranges"
-
Hint: I learned the hard way ... BE SURE you close the spreadsheet and the subgroup
table before attempting to do the File / GetExternalData command.
|
7b.
|
Importing Excel data into SPC Express from a spreadsheet (xls) file
|
If you have data in an Excel spreadsheet and want to import
it into SPC Express for Windows, here's how:
Create a spreadsheet with columns exactly like the fields in your SPC Express subgroups.
Enter these field names in Row 1 of your spreadsheet.
For Example: Date, Time, Sample 1, Sample 2, Sample 3, Operator, Invalidated
Be sure that all fields are text or numeric fields, NOT Date/Time fields.
Be sure that every row of your spreadsheet contains a unique Date/Time.
Enter the letter 'N' (or 'Y') in the Invalidated column.
(Normally you would enter an 'N' - Not Invalidated.)
From Access, open your SPC Express Part File (mdb) but do NOT open the characteristic.
- Click on File, Get External Data, Import.
- Select your spreadsheet (xls) file. Note: You may need to change the extension type in
the "Files of type:" prompt to '*.xls'.
- You should then see a window that looks about like this:
- Click Next.
- You should see a prompt that says "First Row Contains Column Headings". Click Next.
- When asked "In a New Table" or "In an Existing Table", choose Existing Table and
select your characteristic from the drop list, such as "Diameter ---- QC".
Then click Next. Then click Finish.
- This completes the Import.
You should now be able to open the Part File in SPC Express and see all your subgroup data.
|
7c.
|
Importing Excel data into SPC Express using a CSV file
|
If you have data in an Excel spreadsheet and want to import
it into SPC Express for Windows, here's how:
I. If you want to use the Entire Spreadsheet:
- Save the Spreadsheet as a CSV file (Click 'Save As', then choose 'CSV')
- 'Save only the Active sheet' - Click OK
- 'Keep the Format' - Click Yes
- Rename the CSV file to "FileData.txt"
II. If you just want the Highlighted portion of a Spreadsheet:
- Open the spreadsheet in Excel
- Highlight the range of rows and columns which contains the actual sample readings
- Click Edit/Copy to copy the data to the clipboard
- Open WORD, start a new document.
- Click Edit/Paste to paste the data from the clipboard into WORD
- a) If it comes in as a table, place your cursor anywhere inside the
table, the Click Table/Convert/Table to text and choose "commas"
b) If it does NOT get pasted in as a table, but simply as text separated
with tabs, then click on Edit/Replace and replace all ^t with ,
- Click File/SaveAs and save the document as a "Plain Text TXT" file
and give it the name FileData.txt
The FileData.txt is now ready for importing into SPC Express.
Click here for more information.
|
7d.
|
Exporting SPC Express Data into an Excel or CSV file
|
OPTION 1:
If you want to export your SPC Express data into Excel or a CSV (Comma Separated Values) file,
the easiest way to do that is to open the Part File (it's an MDB file, normally associated with Microsoft Access)
using Microsoft Excel instead - Yes, you can do that!!
Excel will prompt you to select which Table you want to open.
Choose the Table that contains the subgroup data for the characteristic that you want.
It will be called something like: Diameter ---- QC Dept.
Once you have it open in Excel, you can Cut/Paste/Reformat ... do whatever you want.
You can even save it as a file in CSV format.
The CSV file will look something like this:
8/15/2005,11:00:00 AM,2.494,2.495,3.333,2.495,3.333,Joe,N
8/15/2005,11:15:00 AM,2.194,2.295,2.395,2.495,2.595,Bob,N
8/15/2005,11:30:00 AM,2.394,2.244,2.111,2.222,2.210,Sue,N
OPTION 2:
Added a Special Option CSV=PRINTEDREPORT which will cause subgroup data (with a header row) to be written
to a CSV file whenever a report (X-Bar R, P, U, N, C, or Histogram) is printed.
The CSV file will be created in the same folder as the Part File (.mdb)
The name of the CSV file will be: 'PartFile ---- Char ---- Dept Data.CSV'.
If a file with that name already exists, it will simply be over-written.
The CSV file will look something like this:
"Date","Time","Sample 1","Sample 2","Sample 3","Operator","Corrective Action","Invalidated"
"11/26/2008","10:21:58 AM"," 1.200"," 1.300"," 1.400","Mark","","N"
"11/26/2008","10:22:25 AM"," 1.300"," 1.300"," 1.000","Mark","","N"
"11/26/2008","01:51:59 PM"," 4.000"," 2.000"," 4.000","Mark","","N"
"09/09/2013","11:17:28 AM"," 2.000"," 2.000"," 2.000","Sue","Adj Shim","N"
"09/09/2013","11:20:12 AM"," 2.300"," 2.500"," 2.100","Sue","","N"
"09/09/2013","11:20:18 AM"," 2.500"," 2.700"," 2.900","Sue","","N"
"09/09/2013","11:20:28 AM"," 2.400"," 2.400"," 2.400","Sue","","N"
OPTION 3:
Every time a Directory Cpk Report is printed, SPC Express creates 2 CSV files in that folder.
One is for the Variable data and the other is for the Attribute data.
The files are named DirCpkVar.csv and DirCpkAtt.csv.
They will over-write any CSV files from previous Directory Cpk Reports.
The CSV file will look something like this:
Part Number,Characteristic,Dept_Process,Subgroups in File,Valid Subgroups in Query,Average,R Bar,StdDev,SD Type,CP Index,CapType,Capability,OOC,Description
"SQRT-TEST","Hypotenuse","QC","2","2"," 2.3660"," 1.2680"," 1.1241","R/d2","0.593","Cpk","0.485 ","",""
"CSV-Test","SG ONE","QC","4","4","17.8750"," 1.1667"," 1.0343","R/d2","0.806","Cpk","0.604","E","Wheel"
"SQRT-TEST","Z-LENGTH","QC","15","15"," 0.5399"," 0.2139"," 0.0919","R/d2","18.127","Cpk","1.957 ","",""
"CSV-Test","Diameter","QC","7","7"," 2.1762"," 0.4714"," 0.2785","R/d2","4.190","Cpk","2.605 ","","Wheel"
"SQRT-TEST","XDIM","QC","57","25"," 1.3842"," 0.3730"," 0.1603","R/d2","72.760","Cpk","2.878 ","",""
"SQRT-TEST","YDIM","QC","53","25"," 2.3442"," 0.3730"," 0.1603","R/d2","72.760","Cpk","4.873 ","",""
|
8.
|
Interfacing a LaserMike with AutoTrans
|
This describes how AutoTrans will interface with a LaserMike Model 182-10.
Function:
This enhancement to AutoTrans will cause a set of pre-defined parameters to be downloaded
into a LaserMike Model 182-10 processor. The parameters are kept in disk files, which will
be maintained by the user, and every set of parameters will be kept in separate disk files.
Whenever the AutoTrans user activates an AutoTrans SETUP, AutoTrans will look for a disk
file called "setupname.LMK" and send it to the LaserMike. AutoTrans will first take the
LaserMike out of RUN mode and put the LaserMike back into RUN mode when the download is
complete. The LaserMike will start sending sample values on a periodic basis as specified in
the parameter (.LMK) file. When the AutoTrans user unactivates a SETUP, it will tell the
LaserMike to stop sending sample values, but it will leave the LaserMike in the RUN mode.
Also, upon activating an AutoTrans SETUP, a "run number" will be placed in the Lot Control
Number field of the first subgroup of that run and propagated into subsequent subgroups for
that run. The "run number" will be determined by the computer and will consist of the Date
and Time, for example: 0602931245 would be used for a run that began on June 2, 1993 at
12:45 pm.
How to Set-up AutoTrans:
Put "SONO-MIKE" in the Special Options field and put the letter "Z" in the SETUP option
field for those SETUP's that will be acquiring samples from the LaserMike and require a
parameter file download.
In the CONFIG.AT file:
Length of the gage records....... 8
Position of the sample........... 1
Length of the Sample............. 8
Position of the Gage ID.......... 0
Length of the Gage ID............ 0
Create a DOS disk file called "setupname.LMK" and put in the commands that you want sent
to the LaserMike. The maximum length of this file will be 100 lines. For example:
PN1003OD.LMK
120+2
121+5
122+5
126+10
176 1.5
177 1.4
178 1.3
17C 1.45
17E 1.35
Note: See the Manual for the Model 182-10 LaserMike for a detailed description of the
commands.
Installation Notes:
AutoTrans version 3.45 or greater is required. To update your system, type:
A:INSTALL A,C for each AutoTrans floppy disk (1 if 3.5" or 2 if 5 1/4")
Use a null modem cable from the PC to the LaserMike.
Programmer's Notes:
* RUN must be OFF before sending parameters.
* You cannot send data at 9600 baud without pausing between characters.
* It sure would be nice if there were separate commands for RUN-ON and RUN-OFF, instead of
toggling.
* Examples of commands:
170+5 set SG size to 5
120+2 set DURATION
121+3 set delay
122+3 set delay
126+10 set XMIT period to 10 seconds
Note: It appears that the period (#126) must be an even multiple of the scan duration
(#120) for a predictably steady transmission of sample values.
Troubleshooting:
Run MMSCOMM3.EXE to see if there is any communication between the PC and the LaserMike Unit.
Be sure the baud rate and parity settings are the same between the 2 units. Try typing 601
(Enter) on the PC and wait for a response from the LaserMike. A 601 is a Date/Time request.
If everything is connected properly the LaserMike should answer with the current date and
time.
Additional information on the LaserMike is available from:
Lasermike Inc.
6060 Executive Drive
Dayton, OH 45424
Phone: (513) 233-9935 Fax: 233-7284
|
9.
|
Interfacing a LaserMike with SPC
Express for Windows
|
Click Here for LaserMike Instructions
|
10.
|
Allowing SPC Express for DOS to
print to a Network or USB Printer
|
A. On the SERVER ...

   Double click "My Computer".
   Double click "Printers".
   RIGHT Click on the printer that you want to print on and choose Properties.
   Choose the Sharing Tab.
   Click Shared and give it a name, like NETPTR1, Click OK.

   You'll need to know the name of your server for later. To see the server's
   name, right click on Network Neighborhood, choose Properties, then go to
   the "Identification" tab. The Server name (Computer Name) should be there.
   Make a note of it.


B. On the Workstation ...

   From a DOS Prompt, type:

   NET USE LPT3: \\servername\NETPTR1
   You should get "The command completed successfully".

   To test it, type this:

   ECHO THIS IS A TEST > LPT3:
   ECHO (Ctrl-L) > LPT3:

C. If you have a USB printer, try this tip ...

   On your PC, share the local printer over the network.
   Then using your PC's name as the 'server', use the command
   NET USE LPT3: \\your PC name\printer name.

D. Now Start SPC Express for DOS.

   Hit ALT-R to Re-Configure, choose LPT3: and select the
   correct printer type (LaserJet, DeskJet, etc.)
   From now on, when SPC Express for DOS prints, it will
   go to the network printer, \\SERVERNAME\NETPTR1.
|
11.
|
Creating a Windows Short-cut for either
SPC Express for Windows
|
You can create a Windows Short-cut to start any of the following programs from your Windows
Desktop:
To create a Short-cut for SPC Express for Windows,
-
Right-click (click the RIGHT mouse button) anywhere on a blank area of your Windows
Desktop
-
You should then see a menu pop-up. Choose New, then Shortcut.
-
On the Command Line, type C:\SPCXW\ExpWin.exe and click Next.
-
When asked for the Name of the Short-cut, type SPC Express and click Next or
Finish.
|
12.
|
Using an Electronic Gage (or Text File)
with SPC Express for Windows
|
- General Information on Gage Interfacing (includes a list of all available formula functions)
- Importing Data from a Text File
- Inter-Window Math (Used with both keyboard and gage data)
- Connecting an Electronic Gage to a USB Port
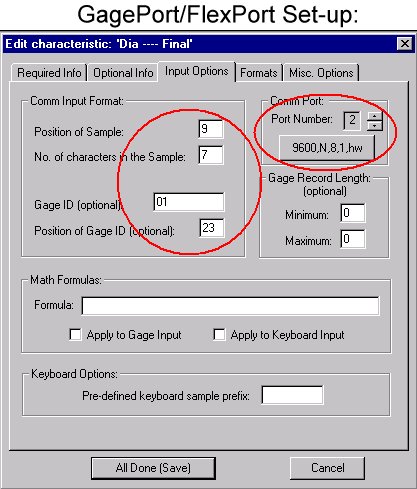
- Click Here for Gage Setup - GagePort/FlexPort
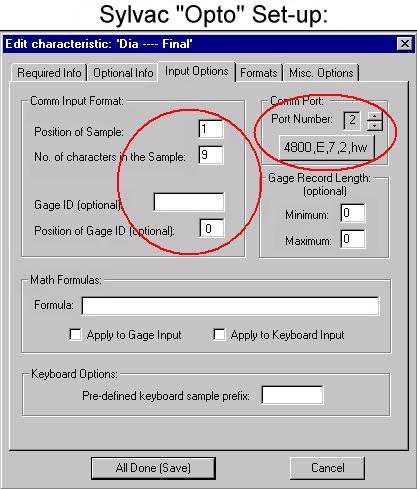
- Click Here for Gage Setup - Sylvac
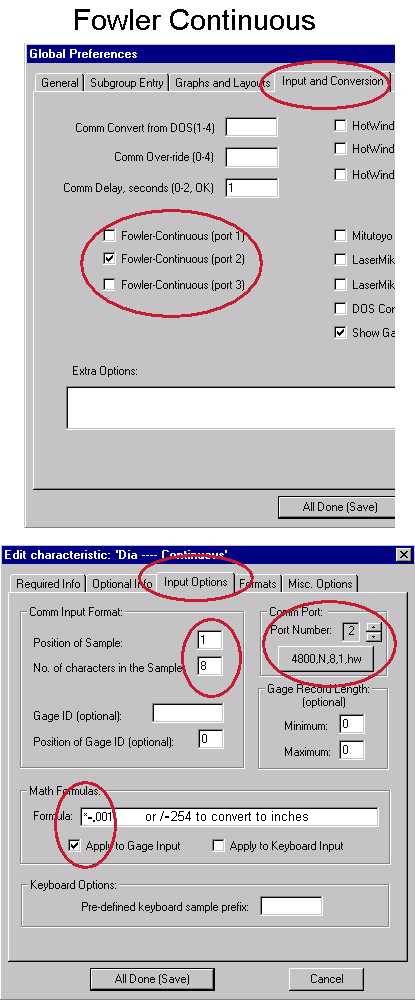
- Click Here for Gage Setup - Fowler Continuous
- Click Here for FlexPort Setup Guide
- Requesting a Periodic Gage Read
|
13.
|
"Database Connection Error" when Starting Release 5
|
If you get a DAO error message like this:
when starting SPC Express for Windows (Release 5), it's because you do not have a new enough
version of Microsoft's database drivers. Just put the SPC Express CD in your drive and
change into the MDAC folder. There is an "exe" file there that you should run.
It will install the latest Microsoft database drivers on your computer. This error
message most commonly occurs on older versions of Windows, such as Windows 95 and Windows
98.
|
14.
|
How to REPAIR a Damaged Part File (.mdb file)
|
To repair a damaged MDB file, do this:
-
Start Microsoft Access 2000.
-
Try to open the mdb file.
-
If you get the message:
"the database needs to be repaired", click YES, you want to attempt to repair.
-
If the database was an Access 97 database, then you will be asked to convert it. Go
ahead a convert it.
Give it a new name such as originalname-c.mdb
-
Then click: Tools / Database Utilities/ Convert Database / to Prior Access Database
Version.
Give it a new name such as originalname-cb.mdb
-
When you are all done, you may Rename the final file back to the original name if you
wish. (Of course, you'll need to rename or delete the original one first.)
If you are getting a "Integrity Error in Database. First record is not 'Date'.":
Not sure why this happens, but sometimes it does. Usually it is because the user
tried editing the mdb file in Access and that altered the order of the
rows in the _MMS3_Variable Field Description table.
There is a "back-door fix" for this situation. In Microsoft Access, open the table called
_MMS3_Variable Field Description which consists of 3 columns: Name, Type, and Format.
Add a 4th column called Sequence (make it numeric) and number each record in the order they really should be.
For example, The Date row should be 1, the Time row should be 2, then all your Traceability rows,
and finally the Invalidated row should be numbered last. These field name MUST BE IN THE EXACT SAME ORDER
as they appear in your subgroup data tables, which appear in the list just below the _MMS4_ table.
Note: this fix requires version 10-02-2013 or newer.
|
15a.
|
What does a typical SPC Express Data File (.MDB) look like?
|
What does a typical SPC Express Data File look like? click here to see
|
15b.
|
Making a Traceability field larger
|
Making a Traceability field larger.
For example, to change the "Fixture" field from 10 characters to 15 characters....
click here to see
|
16.
|
Network Installation Instructions
|
What is the best way to install SPC Express on a Network? Click Here for Details
|
17.
|
Using SPC Express without a Mouse
|
Just like most Windows applications, you can use SPC Express without a mouse,
but you need to know some of the basic rules:
- Menus can be selected using the Alt key and the letter of the menu.
For Example: type Alt-F to drop down the File Menu, Alt-E for the Edit Menu, etc.
- Once a Menu is dropped down, you can use the up and down arrow keys to
highlight the choice that you want, then hit the Enter key.
- Tab advances to the next field on input screens
- Ctrl-Tab will move to the next TAB sheet (such as on Global Preferences)
- Alt-SpaceBar brings up the System Menu (Move, Size, Minimize, Maximize)
- Ctrl-F4 closes the highlighted window
- If you need to "right-click", type Shift-F10.
- SPC Express also provides some short-cut keys. These are indicated on the menus.
For example: Ctrl-T brings up "Select SGS and Chart Options" from the View Menu,
Ctrl-O Opens a file, etc.
- All other standard Windows keystrokes should also work.
|
18.
|
Can’t create the field [SystemOptions] upon startup
|
If you get this error message upon starting SPC Express, it may be because your system can't
add a new field to the Global$$.MMS (Global Preferences) file.
This file is shipped to you in Access 97 format.
Use the Access 2000 format version of this file instead.
To do this rename the current Global$$.MMS file to Global$$97.MMS.
Then rename the file called Global$$2000.MMS to Global$$.MMS.
Also, be sure it is not flagged as "Read-Only".
|
19.
|
Email a Report: How can I do it?
|
If you want to email an SPC Express Report to someone, probably the best way to do it
is to print the report to a "PDF" (Portable Document Format) file instead of
sending it to your own printer.
You can make this choice whenever you print a report.
Windows will automatically ask you to choose your printer.
Well, if you have a PDF writer installed on your system, then that will be one of
your "printer" choices.
There are several low-cost and even free PDF writers available.
CutePDF is free (click here) and pdfFactory is under $50.
|
20.
|
Printer Error #10H -- What's wrong?
|
If you get an error when trying to print (or Print Preview), it is most likely
a bug in your Windows Printer Driver. more info
|
21.
|
Can't read ScopeLog.txt or ScopeTab.txt file
|
If you get an error message about not being able to read the ScopeLog.txt file or the ScopeTab.txt and
you don't even have AutoScope installed, you may just need to reconfigure.
Try this: Click on File/GlobalPreferences and go to the AutoScope tab.
Change to "Enable AutoScope" and save.
Then go to GlobalPreferences again and this time change back to "Disable AutoScope" and save.
This should reset your AutoScope flags and the next time you start SPC Express, everything should be OK.
|
22.
|
Various Alerts
How to Define Alerts & Emails for OOC and OOS
|
You can define a variety of alerts whenever a subgroup is out-of-control or a sample is out-of-spec.
Click here for more info.
Tips on setting up your Email Parameters:
Setting Up Your Email Parameters
|
23.
|
Passwords
Using Passwords with SPC Express
|
You can define passwords for various levels and restrict certain functions at those levels.
Click here for more info.
|
24.
|
Running SPC Express on Windows 7,8,10 (and HELP problems)
|
SPC Express will run on the following Windows Operations Systems: 98, 2000, NT, XP, VISTA, 7, 8, and 10.
If you are having trouble running SPC Express on Windows VISTA, 7, 8, or 10, it's probably because you
have a version of SPC Express from before March 2010.
Be sure to get the latest (it's free if you are on our Annual Maintenance Plan).
On the other hand, we have had reports of the newest SPC Express not running
on old Windows systems such as 98, 2000, NT, and XP Service Pack 1 (SP2+ is OK).
If that is the case, get the latest version but run the "C6" build.
It should be on your installation CD in the 'files' folder.
Problems using Help?
There may also be an issue running SPC Express's traditional Help file format in Windows 7, 8, or 10.
If you click on help, and get an error message, you will need to update to SPC Express version dated June 9, 2017 or newer.
Bad News! Microsoft has dropped support for "HLP" files starting with Windows 10.
They don't even have a download fix.
Good News! The SPC Express help screens have been completely re-written from the old "HLP" format
to the new "CHM" format. CHM Help screens are supported by all versions of Windows including Windows 10.
You'll need to get the latest version of SPC Express (June 9, 2017 or newer).
You may encounter one small glitch, however. By default (it seems) Microsoft prevents you from viewing CHM
help files unless they reside on your local C drive. If your help file (Expwin.CHM) is on your server,
Windows will display the help window with the directory tree in the left-hand pane, but the right-hand pane
containing the detail descriptions will be blank!
Click here for Instructions to correct this
|
25.
|
Turning On/Off Various Spoken Messages
|
You can define which spoken messages you want to hear.
Specify them in the Extra Options field of Global Preferences.
Click here for more info.
|
26.
|
MSCOMM32.OCX has not been registered properly
|
You may get this error message if you open a Part File which is trying to read a comm port.
Without MSCOMM32.OCX properly installed you will NOT be able to read electronic inputs,
such as gages or weigh scales. DO NOT BE FOOLED by the gage seemingly sending data as if
it where a keyboard (HID device).
SPC Express will not work the way it was designed if the input appears to be coming from a keyboard-like device.
Some gage installation instructions may have installed their own software handlers. This is generally not necessary
and quite harmful to SPC Express if it acts like a keyboard. If you encounter the phrase "wedge" in the gage
installation, that is a big red flag. We do NOT want a "WEDGE"! You can tell for sure it's a wedge if you can send
gage readings into an Office product, like WORD, EXCEL, or NOTEPAD.
If you did the SPC Express install procedure correctly, this OCX should already be on your
system and registered. But if you are still getting this message, you can manually copy that file
onto your hard drive and manually register it.
Here's how ...
-
Copy the file, MSCOMM32.OCX onto your hard drive into a folder named C:\Windows\SysWOW64 for Windows 10 or
maybe C:\Windows\System32 depending on your version of Windows. It really doesn't matter where you
put it, because when you register it, you will specify its location.
-
Bring up a Command (DOS) prompt and change into the folder where you put the OCX file, like this:

Please note: in order for that last command to be run, the regsvr32.exe
program (a standard Windows comand) must be in your path.
Don't be afraid to ask an IT person if you need help.
-
If you don't already have a copy of MSCOMM32.OCX dated 6/23/1998 or newer,
you may download it from our website at:
http://www.majormicro.com/Products/MSCOMM32.OCX
If your copy of SPC Express was delivered to you on a CD, you can find that OCX file in the
the D:\Files folder on the CD.
Annual Maintenance Plan in PDF format
Download the Annual Maintenance Plan
http://www.majormicro.com/Docs/Annual_Maintenance_Plan.PDF

